Friday, June 27, 2014

White Chocolate Chip Macadamia Nut Cookies

It's no secret that I'm not a fan of nuts in cookies or candy bars. Well anything dessert wise really. I love them on their own, but for some reason when they are in a dessert I can't stand it. Strange, I know. My sisters never failed to let me know that I was a weirdo for it. 

BP and I were talking about his dads upcoming retirement and how I said I wanted to make him anything he wanted to celebrate it. (The lobsters I had shipped down from the Cape a couple weeks ago was also a nice surprise for them). We were throwing around ideas and these came up and immediately we both knew that I had to make them. 

A couple of days pass and I get around to making them. So there we are, BP's dad and I watching the World Cup (USA vs. Germany) and I tell him about the cookies. What happens next was priceless. This is truly where BP gets this from. BP's dads eyes light up and he says 'I like those a lot'. He finishes eating lunch and looks at me again 'So those cookies are ready to eat?". I say yes and off he goes to get some. He comes back, eating one and a few more on his plate, telling me how great they are. 


He's a huge fan of macadamia nuts - and I have to admit, these cookies are the only acception to my no nuts in cookies rule. So rich and delicious. 

BP makes it home and got to try a few as well - huge hit with him too. Absolutely on my list to make again. 

White Chocolate Chip Macadamia Nut Cookies
Makes about 30 cookies 

ingredients:
1 1/2 cups all purpose flour
1/2 teaspoon baking soda
1/4 teaspoon salt
1/2 cup (1 stick) unsalted butter, room temperature
1/2 cup packed light brown sugar
1/3 cup granulated sugar
1 large egg
1 1/4 teaspoons vanilla extract
1 cup white chocolate chips
1 cup coarsely chopped salted macadamia nuts

directions:
1.  Preheat oven to 325°F. Line two baking sheets with parchment paper or silpats. Set aside.

2.  In a medium bowl, whisk together flour, baking soda and salt. Set aside.

3.  In a stand mixer, beat butter and sugars until light and fluffy. Add egg, vanilla extract, and almond extract.

4.  Add flour mixture, mixing until completely combined. Stir in white chocolate chips and macadamia nuts until evenly distributed (you can do this by hand or with the stand mixer).

5.  Using your 1 1/2" cookie scoop, evenly scoop dough onto prepared sheets. 

6.  Bake for 12 minutes, or until the edges are very slightly browned. The cookies will not look cooked in the center, but they will finish cooking while cooling on cookie sheet.  Remove from oven and let cookies rest on baking sheet for 10 minutes. Then transfer to a wire rack to cool completely. Store in an airtight container for up to 7 days.

Monday, June 23, 2014

Milky Way Chocolate Chip Cookies

As you all know, my love for caramel runs deep. The Milky Way candy bar has always been one of my favorites. When Halloween rolled around I knew I was going to hit the jackpot with them. So many people would hand them out. I loved it, my sisters not so much. We would trade candy at the end of the night or the next day - I would give them all of my Snickers (still to this day I don't like Snickers or any candy with peanuts in it. Those two things should be separate in my mind.), and I would get all of their Milky Ways. Heaven. So needless to say when I saw these bad boys, I snatched that recipe up and made a few tweaks. 

Some of our friends were having a BBQ and of course I was going to bake things for it.  The hosts had requested some Slutty Brownies (in one of the best baking requests I've ever gotten) and I wanted to make something else just incase - always better to be over prepared than under prepared. 


Oh man - these guys are awesome. I have to admit, I ate way more cookie dough than I should of while making these....but so tasty. Next time I might use more Milky Ways in them  since I felt like it wasn't enough, but the 12 mini ones I used did them justice. 

Milky Way Chocolate Chip Cookies
Makes about 4 dozen 

2 sticks butter, softened
¾ Cup sugar
¾ Cup brown sugar
2 eggs
1 teaspoon vanilla
2 ¾ Cups flour
1 teaspoon baking soda
½ teaspoon salt
12 mini milky ways, coarsely chopped
2 cups semisweet chocolate chips
Instructions

1. Preheat oven to 350 degrees F. Line cookie sheets with parchment paper or Silpats.  In a large bowl cream the butter and sugars with a mixer. Beat in eggs and vanilla until well combined. In a separate bowl combine the flour, baking soda and salt. Slowly add the flour mixture to the wet ingredients. Once combined, add the chopped milky ways and chocolate chips. Mix until combined. 

2. Scoop cookies onto a lined baking sheet. Bake for 8-10 minutes. Let cool for 2 minutes on baking sheet then transfer to a cooling rack.

Friday, June 20, 2014

Ice Cream Cake

Chances are that if your birthday is in the summer, you get an ice cream cake for your birthday every year. My birthday is in the end of July and I'm pretty sure I actually only had real cake two or three times for my birthday. The rest of the time it's always been an ice cream cake. 

Over the years my mom got adventurous with the cakes: Ben and Jerry's, Coldstone and Carvel. Carvel ones have always been my favorite. The icing and those chocolate crunchies in the middle - awesome. 

I found out one of our friends wanted an ice cream cake for his birthday - and me being the baker of our group (and now official birthday cake maker of our group), knew that I was going to make my feat ever ice cream cake for him.  Start to finish - bust out Izzy and make some ice cream, find out how to make the crunchies and assemble the cake. 

Little did I know this was ridiculously easy. Now you don't have to make your own ice cream, your favorite store bought ones will work just as well. 


So because I went the extra mile (let's face it I have a lot of time on my hands since I'm still out of work), it took me three days from start to finish. But it was so worth it. 


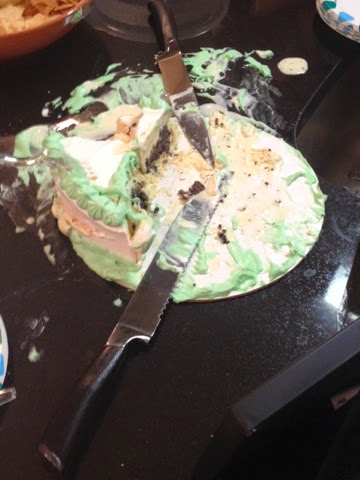
Let's just say that it didn't last long between all of us.  By the end the cake looked like it belonged at a murder scene. 


Delicious - and I'm sure I will be making these cakes again and again.

Ice Cream Cake

4 quarts of your favorite ice cream (1 or 2 flavors)
One box Oreo Cones or one container Oreo crumbs
One container Magic Shell (chocolate)
One container Cool whip
One 9" spring form pan with wax paper on the bottom


1. Freeze springform pan with wax paper over the bottom and sides of pan.

2. Let 2 containers of one flavor melt a little bit.

3.  Crush cones and mix with about 1/2 container of well shaken Magic Shell, should be wet, but not soaking wet. Feel free to taste.

4.  Take out springform pan and spread ice cream over the bottom half (if you have ice cream left over, feel free to eat it)
Add "crunchies" and press down on them. KEEP CRUNCHIES AT LEAST 1 CENTIMETER FROM THE EDGES. There needs to be some ice cream to ice cream contact.
Freeze a couple of hours. 

5. Let 2 containers of the other flavor soften up a little bit (like the above).

6.  Take the springform pan out and plop ice cream down on top of the bottom layer (you don't want to put it all in one space as you'll need to spread it out to cover it all evenly - if you plop it all down in the center, it tends to pull the cruchies up here & there).
Smooth out the top as best as possible with a long spatula (or bread knife).
Freeze overnight.

7.  Take out of the freezer and dip the whole springform pan in hot water very quickly (as much as you can dip without it coming over the top). This should melt the sides just enough to release the cake from the pan.

8.  Decorate with cool whip. Freeze a couple of hours or overnight. 

When ready to serve, like any ice cream cake, let sit out for 15-20 minutes before you are ready to cut into it. 

Thursday, June 12, 2014

Easy Egg Casserole

BP and I have been on a breakfast kick lately. Baked French Toast, egg sandwiches and now this egg casserole. Saturday mornings here are awesome. 

Now if you think you can't handle this or just don't have any breakfast skills at all, then this is for you. Trust me when I say that anyone can make this. And how good is it? I made it for a friends baby shower and 2 trays of it went within minutes. 

Now if you aren't a fan of using breakfast sausage, then use whatever you want in this - it works amazing well with everything you put in it. I made ours with garlic, onion and ham. Delicious.  BP loved it. 


So try it out this weekend....you won't be disappointed. Also a great meal to make with your kids. 

Easy Egg Casserole 
Makes one 13x9 pan

INGREDIENTS

1 pound breakfast sausage or whatever meats/vegetables you want to use 
2 cups shredded mozzarella cheese
1 can refrigerated crescent dinner rolls (8 oz)
4 large eggs, beaten
3/4 cup milk
1/4 teaspoon salt
1/8 teaspoon black pepper


DIRECTIONS

1.  Preheat oven to 425F. Crumble and cook sausage or meats/vegetables in skillet over medium heat until browned. Drain sausage. 

2.  Line bottom of greased 13 x 9 inch baking dish with crescent roll dough, firmly pressing perforations to seal. Sprinkle with sausage and cheese. 

3.  Combine remaining ingredients in medium bowl until blended, pour over sausage. 

4.  Bake 15 minutes or until set. Let stand 5 minutes before cutting into squares; serve hot. Refrigerate leftovers.

Thursday, June 5, 2014

Chocolate Ganache

I'm the first to admit it that I can't decorate a cake AT ALL. We've seen many examples of this over the years - the latest example was my Darth Vader Cake that I made. All I could say was it tasted good and it was still in the shape of Darth Vader. Points for trying right? 

So for all of you that are like me out there (I'm hoping I'm not alone in this boat), welcome to your new way to decorate cakes. Simple and delicious an everyone will be extremely impressed. Trust me - it will turn any cake into an amazing cake. Homemade, out of a box, whatever you prefer, this is going to be a staple in your recipe box. 


I made this cake for our friends birthday. It was a huge hit. Everyone loved it. Before I knew it, half of the cake was gone. Trust me - it's worth the time and effort. 


Chocolate Ganache 
Makes about 7 cups 

4 cups heavy cream
4 cups semisweet chocolate, chips or finely chopped
1/4 cup light corn syrup
1/4 tsp salt
1/4 coffee extract (optional)

1.  In a medium size saucepan over medium-high heat, bring the heavy cream to a full boil.  Turn off heat and add chocolate slowly to the pan. Slowly whisk mixture until smooth. Add corn syrup, salt and extract, and stir until combined.

2.  Transfer half of mixture (3 1/2 cups) into a large bowl. Pour remaining mixture into small bowl. Let cool completely, stirring frequently, about 40 minutes. 

3.  Once fully cooled, take mixture in large bowl and beat on medium-high speed until ganache holds soft peaks, 5-7 minutes. 

4.  Taking your cake layers - place whipped ganache on one layer of cake and spread evenly. Top with remaining layer and repeat with more whipped ganache. Repeat if 3rd layer. Spread remaining whipped ganache in a thin layer over the entire cake. Refrigerate until set, at least 30 minutes. 

5.  Once cake is set, transfer cake to wire rack with a rimmed baking sheet under it. Take small bowl of ganache and slowly pour on top of cake. Take an offset spatula to evenly distribute ganache over the top and sides of cake.  Keep pouring ganache over cake until cake is covered entirely. Refrigerate until ganache is set, at least 30 minutes. At this point you can transfer it to a cake platter.