Friday, June 20, 2014

Ice Cream Cake

Chances are that if your birthday is in the summer, you get an ice cream cake for your birthday every year. My birthday is in the end of July and I'm pretty sure I actually only had real cake two or three times for my birthday. The rest of the time it's always been an ice cream cake. 

Over the years my mom got adventurous with the cakes: Ben and Jerry's, Coldstone and Carvel. Carvel ones have always been my favorite. The icing and those chocolate crunchies in the middle - awesome. 

I found out one of our friends wanted an ice cream cake for his birthday - and me being the baker of our group (and now official birthday cake maker of our group), knew that I was going to make my feat ever ice cream cake for him.  Start to finish - bust out Izzy and make some ice cream, find out how to make the crunchies and assemble the cake. 

Little did I know this was ridiculously easy. Now you don't have to make your own ice cream, your favorite store bought ones will work just as well. 


So because I went the extra mile (let's face it I have a lot of time on my hands since I'm still out of work), it took me three days from start to finish. But it was so worth it. 


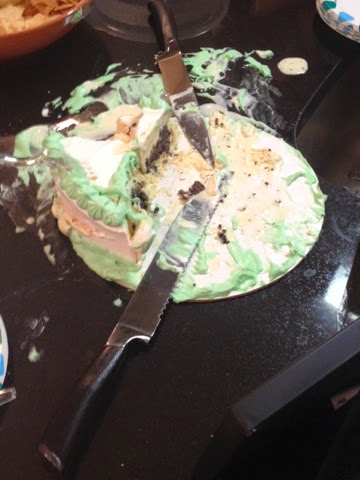
Let's just say that it didn't last long between all of us.  By the end the cake looked like it belonged at a murder scene. 


Delicious - and I'm sure I will be making these cakes again and again.

Ice Cream Cake

4 quarts of your favorite ice cream (1 or 2 flavors)
One box Oreo Cones or one container Oreo crumbs
One container Magic Shell (chocolate)
One container Cool whip
One 9" spring form pan with wax paper on the bottom


1. Freeze springform pan with wax paper over the bottom and sides of pan.

2. Let 2 containers of one flavor melt a little bit.

3.  Crush cones and mix with about 1/2 container of well shaken Magic Shell, should be wet, but not soaking wet. Feel free to taste.

4.  Take out springform pan and spread ice cream over the bottom half (if you have ice cream left over, feel free to eat it)
Add "crunchies" and press down on them. KEEP CRUNCHIES AT LEAST 1 CENTIMETER FROM THE EDGES. There needs to be some ice cream to ice cream contact.
Freeze a couple of hours. 

5. Let 2 containers of the other flavor soften up a little bit (like the above).

6.  Take the springform pan out and plop ice cream down on top of the bottom layer (you don't want to put it all in one space as you'll need to spread it out to cover it all evenly - if you plop it all down in the center, it tends to pull the cruchies up here & there).
Smooth out the top as best as possible with a long spatula (or bread knife).
Freeze overnight.

7.  Take out of the freezer and dip the whole springform pan in hot water very quickly (as much as you can dip without it coming over the top). This should melt the sides just enough to release the cake from the pan.

8.  Decorate with cool whip. Freeze a couple of hours or overnight. 

When ready to serve, like any ice cream cake, let sit out for 15-20 minutes before you are ready to cut into it. 

Thursday, June 12, 2014

Easy Egg Casserole

BP and I have been on a breakfast kick lately. Baked French Toast, egg sandwiches and now this egg casserole. Saturday mornings here are awesome. 

Now if you think you can't handle this or just don't have any breakfast skills at all, then this is for you. Trust me when I say that anyone can make this. And how good is it? I made it for a friends baby shower and 2 trays of it went within minutes. 

Now if you aren't a fan of using breakfast sausage, then use whatever you want in this - it works amazing well with everything you put in it. I made ours with garlic, onion and ham. Delicious.  BP loved it. 


So try it out this weekend....you won't be disappointed. Also a great meal to make with your kids. 

Easy Egg Casserole 
Makes one 13x9 pan

INGREDIENTS

1 pound breakfast sausage or whatever meats/vegetables you want to use 
2 cups shredded mozzarella cheese
1 can refrigerated crescent dinner rolls (8 oz)
4 large eggs, beaten
3/4 cup milk
1/4 teaspoon salt
1/8 teaspoon black pepper


DIRECTIONS

1.  Preheat oven to 425F. Crumble and cook sausage or meats/vegetables in skillet over medium heat until browned. Drain sausage. 

2.  Line bottom of greased 13 x 9 inch baking dish with crescent roll dough, firmly pressing perforations to seal. Sprinkle with sausage and cheese. 

3.  Combine remaining ingredients in medium bowl until blended, pour over sausage. 

4.  Bake 15 minutes or until set. Let stand 5 minutes before cutting into squares; serve hot. Refrigerate leftovers.

Thursday, June 5, 2014

Chocolate Ganache

I'm the first to admit it that I can't decorate a cake AT ALL. We've seen many examples of this over the years - the latest example was my Darth Vader Cake that I made. All I could say was it tasted good and it was still in the shape of Darth Vader. Points for trying right? 

So for all of you that are like me out there (I'm hoping I'm not alone in this boat), welcome to your new way to decorate cakes. Simple and delicious an everyone will be extremely impressed. Trust me - it will turn any cake into an amazing cake. Homemade, out of a box, whatever you prefer, this is going to be a staple in your recipe box. 


I made this cake for our friends birthday. It was a huge hit. Everyone loved it. Before I knew it, half of the cake was gone. Trust me - it's worth the time and effort. 


Chocolate Ganache 
Makes about 7 cups 

4 cups heavy cream
4 cups semisweet chocolate, chips or finely chopped
1/4 cup light corn syrup
1/4 tsp salt
1/4 coffee extract (optional)

1.  In a medium size saucepan over medium-high heat, bring the heavy cream to a full boil.  Turn off heat and add chocolate slowly to the pan. Slowly whisk mixture until smooth. Add corn syrup, salt and extract, and stir until combined.

2.  Transfer half of mixture (3 1/2 cups) into a large bowl. Pour remaining mixture into small bowl. Let cool completely, stirring frequently, about 40 minutes. 

3.  Once fully cooled, take mixture in large bowl and beat on medium-high speed until ganache holds soft peaks, 5-7 minutes. 

4.  Taking your cake layers - place whipped ganache on one layer of cake and spread evenly. Top with remaining layer and repeat with more whipped ganache. Repeat if 3rd layer. Spread remaining whipped ganache in a thin layer over the entire cake. Refrigerate until set, at least 30 minutes. 

5.  Once cake is set, transfer cake to wire rack with a rimmed baking sheet under it. Take small bowl of ganache and slowly pour on top of cake. Take an offset spatula to evenly distribute ganache over the top and sides of cake.  Keep pouring ganache over cake until cake is covered entirely. Refrigerate until ganache is set, at least 30 minutes. At this point you can transfer it to a cake platter. 

Wednesday, May 28, 2014

Baked French Toast

Ah weekends. Nothing beats sleeping in. Not that we sleep in like we did in our college days. Long gone are the days of sleeping in past noon. Now we're lucky if we make it to 10 AM....usually it's somewhere around 9 AM. Getting old means waking up earlier right? Might have to fight that as hard as I can.

BP is a fan of breakfast in bed, especially when he has played poker until the early hours the night before. So while he was playing poker, I prepped an excellent breakfast for us. Nothing beats a easy and delicious breakfast. 

I got up and got myself ready and then headed down to the kitchen to make breakfast while BP slept a little more. All I had to do was sprinkle the topping ontop and put it in the oven - can't beat that. While it was baking away I had some coffee and got ready for the day. I have to say that this smells so amazing while baking. I couldn't wait for it to be done. 


Oh man was this a huge hit! And it reheats amazingly well! So if you have leftovers don't worry. Mix it up with your favorite bread: Challah, Cinnamon Raison, Pumpkin, your choices are endless. So go ahead and make this over the weekend, you won't be sorry. 

Baked French Toast

French Toast
 Butter, For Greasing
1 loaf Crusty Sourdough Or French Bread
8 whole Eggs
2 cups Whole Milk
1/2 cup Heavy Cream
1/2 cup Sugar
1/2 cup Brown Sugar
2 Tablespoons Vanilla Extract

 Topping
1/2 cup Flour
1/2 cup Firmly Packed Brown Sugar
1 teaspoon Cinnamon
1/4 teaspoon Salt
 Freshly Grated Nutmeg (optional)
1 stick Cold Butter, Cut Into Pieces
 Warm Syrup, For Serving
 Butter, For Serving

Prep:
For the French toast: Grease 13x9" baking pan with butter. Tear the bread into chunks, or cut into cubes, and evenly distribute in the pan. Crack the eggs in a big bowl. Whisk together the eggs, milk, cream, granulated sugar, brown sugar and vanilla. Pour evenly over the bread. Cover the pan tightly and store in the fridge until needed (overnight preferably). Or you can make it and bake it right away---delicious no matter what!

For the topping: Mix the flour, brown sugar, cinnamon, salt and some nutmeg in a separate bowl. Stir together using a fork. Add the butter and with a pastry cutter, and mix it all together until the mixture resembles fine pebbles. Store in a plastic bag in the fridge.

When you're ready to bake the casserole, preheat the oven to 350 degrees F. Remove the casserole from the fridge and sprinkle the topping over the top. Bake for 45 minutes for a softer, more bread pudding texture or for 1 hour-plus or more for a firmer, crisper texture.
Scoop out individual portions. Top with butter and drizzle with warm pancake syrup. 

Tuesday, May 27, 2014

Pineapple Upside Down Cake

Holiday weekends are the best. Since we had an extra day to sleep in and hang out with friends, BP and I decided to have Game Night at our house with some friends. Out of the 10 we invited, 8 were coming over. Full house for us - that means I had to make enough food to feed all 11 of us (this includes myself, BP and his dad). Spaghetti and Meatballs for dinner and two desserts. 

BP had requested something with coconut. But when our search for the ingredients I needed came up short we had to change it up - and Pineapple Upside Down Cake it was. 

This was my first time making this and I have to say, it's incredibly easy. And the fact that it's pretty as well is always a bonus. 


I mean look at that - it's wrong how easy this was for it to be so pretty looking. And since there were so many of us, I made some Slutty Brownies as well. 


After a heated battle of Risk on the guys end and a hilarious version of a Scattegories on the ladies end it was time for dessert. Both were a huge hit. Not much of either were left at the end of the night after we finished playing Cards Against Humanity. 

Overall, an excellent night with great friends. We love a good game night. 

Pineapple Upside Down Cake

Topping: 
1/4 cup unsalted butter, melted
1/2 cup light brown sugar
sliced pineapple (6 canned slices or use fresh)
15-20 maraschino cherries

CAKE
1 and 2/3 cups  all-purpose flour, careful not to overmeasure
1/2 teaspoon baking powder
1/4 teaspoon baking soda
1/2 teaspoon salt
1/2 cup unsalted butter, melted
3/4 cup  light brown sugar
1/4 cup granulated sugar
1 large egg, room temperature preferred
1/4 cup yogurt
1/2 cup milk or buttermilk
1/4 cup pineapple juice (reserved from the canned pineapple or use fresh)
1 Tablespoon vanilla extract

Directions:

Preheat oven to 350F degrees.

Prepare topping first. Place 1/4 cup of melted butter into a 9-inch pie dish or 9x2 inch round cake pan. Sprinkle with 1/2 cup of brown sugar. Top with pineapple slices and arrange cherries between the pineapple slices.

In a medium bowl, mix together flour, baking powder, baking soda, and salt. Set aside. In a large microwave-safe bowl, melt butter in the microwave. Whisk in the sugars vigorously getting out any brown sugar lumps - mixture will be gritty. Whisk in egg, yogurt, milk, pineapple juice, and vanilla extract until combined. Slowly mix in dry ingredients until no lumps remain. Batter will be thick.

Pour/spoon batter into prepared pan. Bake for 20 minutes. Cover loosely with aluminum foil (loosely to avoid the top from sticking to the foil). Bake for 20-25 more minutes or until a toothpick inserted in the center comes out clean. Allow to cool for 10 minutes.

Invert cake on top of a cake stand or a large serving plate. Slice and serve warm, room temperature, or even cold. Try serving with vanilla ice cream - it's a delicious combination. Cover cake and store for up to 3 days in the refrigerator.

Friday, April 25, 2014

Homemade Hostess Cupcakes

Growing up, getting a Hostess Cupcake was a treat. I still have one or two a year. But once you make these at home, I promise you will never want the store bought ones again. 

BP's boss is leaving and he asked me to bake something for her last day. I had total free reign and this came to mind right away - mainly because I was craving one. Once he approved them, off I went. 


Oh how I couldn't wait for these to be ready to try. Time seemed to inch by, it was like torture. But man was it worth the wait. 


I took some to my ladies night dinner with me and they were a huge hit. BP also couldn't wait to get home from work and try one as well. Of course he loved them. A beloved cupcake by all. 

Homemade Hostess Cupcakes 
Makes 18

Cupcakes:
1 1/2 cups all purpose flour
3/4 cup cocoa powder
1 1/2 cups sugar
1 1/2 tsp baking soda
3/4 tsp baking powder
3/4 tsp salt
3/4 cup milk
3 tbsp vegetable oil 
1 tsp vanilla extract
3/4 cup warm water

1. Preheat oven to 350 degrees. Line cupcake trays with paper liners. Set aside.
2. In large bowl add all dry ingredients and mix until combined. Add all wet ingredients and mix, until smooth and combined. 
3. Divide batter into cupcakes evenly. Bake, rotating halfway through, about 20 minutes. Let cool completely. 

Make icing:
8 oz semisweet chocolate chips
2/3 cup heavy cream
1 tbsp light corn syrup

In a small heatproof bowl place chocolate chips and set aside. In a small saucepan combine heavy cream and corn syrup and heat over medium heat until just boiling. Pour mixture over chocolate chips and let sit for 5 minutes. Stir mixture together until smooth.

While chocolate mixture is melting - make filling. 

Filling: 
3/4 cup shortening
1/3 cup butter
1 cup marshmallow fluff
1 1/4 cup confectioners sugar
1 tsp vanilla extract

1. Beat butter and shortening together until smooth and creamy. Add marshmallow fluff, confectioners sugar and vanilla extract and mix until combined. Mix on high for 10 seconds to make light and fluffy. 

2. Cut a slit on the too of each cupcake. Fill pastry bag with filling and pipe mixture into each cupcake. Save remaining filling for topping.

3. Dunk the tops of filled cupcakes into ready chocolate ganache and let set for at least 30 minutes. 

4. Decorate tops of cupcakes with swirls or writing. 

Tuesday, April 15, 2014

Best. Cookie. Ever

Things have been hectic to say the least. Between being constantly sick and so much stress at work I felt like I was going to break. My parents raised me to always give 110% with everything I do. I felt like I was going to burn out at any moment, and then my boss sat me down and told me they had to let me go. So now I'm trying to find a new job and once again have a lot of free time on my hands. What do I do to fill it? Bake. 

I've been craving these cookies for a while now, but just never had the time to make them. So these were up high on my list of things to make.

I didn't have all of the add ins needed, so I went with what I had on hand in the house. I had accidentally bought butterscotch chips one day and didn't realize it until I opened the bag and poured then into a bowl. I had to set them aside for later use - and these cookies were going to be it. Usually I make these with chocolate chips, chunks of caramel and toffee bits. Today I went with chocolate chips, butterscotch chips and caramel bits (these are made by Kraft and are perfect for your baking needs! No more unwrapping and cutting up caramel squares. These are my BFF for any baking needs with caramel. They are in the baking aisle with chocolate chips). And let me tell you, the taste alone from sneaking a bite (ok more like 4) of the dough, these are going to be amazing. 


Oh man are these delicious! Everyone who has tried one loves them. These are a must make. 

Best cookie ever
Makes 72 cookies

2 cups minus 2 tbsp cake flour
1 2/3 cups bread flour
1 1/4 tsp baking soda
1 1/2 tsp baking powder
1 1/2 tsp salt
2 1/2 sticks butter, room temperature
1 1/4 cups dark brown sugar
1 cup plus 2 tbsp sugar
2 eggs
2 tbsp vanilla extract
2 cups semi sweet chocolate chips
2 cups butterscotch chips
2 cups caramel bits 

1. In a large bowl soft together flours, baking soda, baking powder and salt; set aside.
2. In another large bowl or your mixer fitted with the paddle attachment, cream the butter and both sugars until light and fluffy, about 5 minutes. Add eggs, one at a time, mixing well after each addition. Stir in vanilla. Reduce speed to low and slowly add in flour mixture. Mix until just combined. Add in chocolate chips, butterscotch chips and caramel bits and mix until incorporated. 
3. Transfer dough to a large bowl and press plastic wrap against the dough. Refrigerate for 24-36 hours. (Can be refrigerated for up to 72 hrs max).

When ready to bake:
1. Preheat oven to 350 degrees and line cookie sheets with parchment paper or Silpats. 
2. Scoop out cookie dough with 1 1/2" cookie scoop into prepared cookie sheets.
3. Bake until golden brown 10-15 minutes, rotating sheets halfway through. Transfer cookies to wire racks to cool completely.