Tuesday, January 31, 2012

Lemon Meringue Cupcakes

It's been really warm where I live the past couple of days, and winter baking just didn't feel right.  I came across these and knew that I had to make them.  A tender lemon cake with a lightly browned marshmallow frosting - perfect for the warmer weather.  The hardest part of these is browning the marshmallow frosting.  After my small oops with the last cupcakes I made I was hoping for no mistakes - and I only had 1.  If I'm going to have a bunch of small, minor mistakes instead of 1 giant one, I'll take it.  While browning one of the tops of the cupcakes, I accidentally dropped the cupcake.  But not only did I drop it, the top was slightly on fire.  Luckily as it dropped it fell top down and the small flames went out - and I had marshmallow all over the counter.  But that was the worst of it, and was happy that it happened with only 4 cupcakes left to brown.  You can also add a layer of lemon curd on top of each cupcake before you put the marshmallow frosting on top.  I'm not a fan of lemon curd, I always find it too tart so I left it out.  But if you're a fan, add it in. 

toasted perfection
Lemon Meringue Cupcakes
makes 24

3 cups all purpose flour
1 tbsp baking powder
1 cup butter, room temperature
2 cups sugar
4 large eggs, room temperature
3 tbsp lemon zest
2 tbsp lemon juice
1 tsp vanilla extract
1 cup buttermilk
Lemon Curd (optional)
Marshmallow Frosting

  1. Preheat oven to 325 degrees.  Line standard muffin tins with paper liners.  In a small bowl, whisk together flour, baking powder and salt; set aside.
  2. With an electric mixer on medium-high speed, cream butter and sugar until pale and fluffy.  Add eggs, one at a time, beating until each is incorporated, scraping down sides of bowl as needed.  Beat in zest and vanilla.  Add flour mixture in 3 batches, alternating with two additions of buttermilk and lemon juice, and beating until just combined after each. 
  3. Divide batter evenly among lined cups, filling each three-quarters full.  Bake, rotating tins halfway through, until golden brown and a cake tester inserted in the center comes out clean, about 25 minutes.  Transfer tins to wire racks to cool completely before removing cupcakes. 
  4. If using lemon curd, spread 1 tbsp of lemon curd onto middle of each cupcake.  Then top with frosting.  Hold a small kitchen torch 3-4" away from surface of frosting and wave it back and forth until frosting is lightly browned all over. 
Marshmallow Frosting

1 1/2 cups plus 2 tbsp sugar
2/3 cup water
2 tbsp light corn syrup
6 large egg whites, room temperature

Combine 1 1/2 cups sugar with the water and corn syrup in a small saucepan; clip a candy thermometer to the side of the pan.  Bring to a boil over medium heat, stirring occasionally, until sugar dissolves.  Continue boiling, without stirring, until syrup reaches 230 degrees.

Meanwhile, in the bowl of a standing electric mixer fitted with the whisk attachment, whisk egg whites on medium-high speed until soft peaks form.  With mixer running add remaining 2 tbsp sugar, beating to combine. 

As soon as sugar syrup reached 230 degrees, remove from heat.  With mixer on medium-low speed, pour syrup down side of bowl in a slow, steady stream.  Raise speed to medium-high; whisk until mixture is completely cool (test by touching the bottom of the bowl) and stiff (but not dry) peaks form, about 7 minutes.  Use immediately. 

Thursday, January 26, 2012

Irish Coffee Cupcakes

When I was a kid, I loved the Hostess Cupcakes.  Still kind of do, have one maybe once a year.  Someone had suggested that I make an "adult version" of them and I had just come across a recipe for one in David Lebovitz's 'Ready For Dessert'.  This sounded like it was a going to be a fantastic cupcake.  Chocolate cake with a Bailey's Cream Cheese Filling and a Chocolate Whiskey Glaze.  Definitely a grown up version. 

mmmm....now thats a food porn shot
These are easy, just a little time consuming.  And of course, I had a boo boo.  Just a minor one but it was time consuming nonetheless. I made the cupcakes and let them fully cool.  Once cooled, I cored out the middle of each cupcake and set them aside (I really need to get a cupcake corer.  At first I thought they were needless, but now that I'm doing more and more filled cupcakes, it looks to be a wise investment.  Will be purchasing one in the near future).  I made the filling and filled each cupcake.  Then I saw my fatal mistake.  I had to put the cap back on each cupcake.  I had a giant mound of tops just sitting there waiting for me.  And of course I had eaten a couple because I wanted to taste the cake.  Fail - fail on my part.  Away I went trying to find the right cap for each cupcake and ended up with a lot of crumbs.  I smooshed them together and made my own cap for cupcakes in need. 
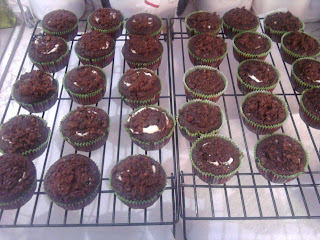
not the prettiest thing, right?
Time to make the glaze.  I was still laughing when I remembered a request from a friend - the next time I had a mistake to take the picture of booze that we all know is coming and wrap it in the quilt she made me (which I love to death). 
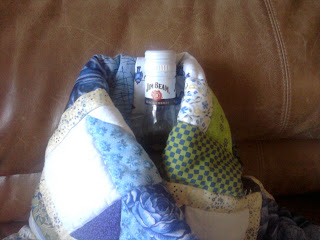
Jim needed a time out before he got used
Back to the glaze.  It's fairly easy and was ready in minutes.  Time to dip each cupcake in it.  A flash of panic went through my mind.  What if the tops fell off and then I had filling and cupcake floating in the chocolate?!  Nervously I dipped the first cupcake in and it was fine.  I cautiously dipped the rest of them in, and happily only a few crumbs ended up floating in the chocolate pool. 

all dipped and time to set
Once set, I packed them up and went off to play treat fairy.  These were a huge hit.  Everyone loved them.  So they weren't the prettiest things, but they were amazingly tasty.  And I'm happy that my sacrifice to the Baking Gods was small and made me laugh, but I do fear for a large one for they are never pretty.

Irish Coffee Cupcakes
makes 12 cupcakes

Cupcakes
1 1/4 cups all purpose flour
1 tsp baking powder
1/4 tsp baking soda
1/4 tsp salt
1 cup strong brewed coffee
6 tbsp cocoa powder
1/2 cup butter, at room temperature
1 1/4 cups packed light brown sugar
2 large eggs, room temperature
2 tsp vanilla extract
Filling
4 oz cream cheese, room temperature
4 tbsp butter, room temperature
6 tbsp powdered sugar
1 tbsp plus 1 tsp Irish Cream Liqueur, such as Bailey's Irish Cream
Glaze
4 oz bittersweet or semisweet chocolate, chopped
1/4 cup heavy cream
2 tsps light corn syrup or agave nectar
2 tbsp whiskey

Preheat oven to 350 degrees.  Line standard muffin tin with cupcake liners.

To make the cupcakes, into a small bowl, sift together the flour, baking powder, baking soda, and salt.

In a medium saucepan, heat the coffee until almost boiling.  Remove from the heat and whisk in the cocoa until dissolved, then add the butter, stirring until melted.  Whisk in the brown sugar and let cool until tepid.  Whisk in the eggs and vanilla, then stir in the flour mixture, mixing just until incorporated.  Don't overmix. 

Divide the batter among the cupcake liners and bake until the cupcakes feel just set in the center, 20-22 minutes.  Let cool completely.

To make filling, in a stand mixer fitted with the paddle attachment or a food processor fitted with a metal blade, beat together cream cheese, butter and powdered sugar until smooth.  Beat in the Irish Cream Liqueur. 

To fill the cupcakes, use a sharp knife to cut a 2" cone shaped hole in the center of each cupcake.  Remove the plug-like pieces.  Trim off the tip of each plug to create a disk-shaped piece that is 1/3" thick.  Save these disks for capping the filled cupcakes.

Divide the filling among the cupcakes, then gently press the caps into the filling.  They won't fit perfectly, which is fine, and some filling may bulge out. 

To make the glaze, melt the chocolate with the cream and corn syrup or agave nectar in a small saucepan over low heat, stirring until smooth.  Remove from the heat and stir in the whiskey.

Dip the tops of the filled cupcakes in the glaze, completely sealing the tops and generously coating them.  Let cool, right side up, until the glaze is firm. 

Tuesday, January 24, 2012

Sugar and Spice Coffee Cookies

I was a little unsure about these, I've never been a fan of cinnamon in my coffee so why would I like it in a cookie?  Well, these cookies are great!  The spices and coffee work amazingly well together and don't overpower one another.  But my favorite part about these, is that they are cookies that you make ahead and let the dough chill in the fridge/freezer until you are ready to use it.  Nothing beats that type of cookie.  They are usually extremely easy and tasty, and you can always make the dough and keep it in the freezer for 3 months.  Never hurts to have some cookie dough all ready and waiting for you to slice it up and bake them off. 

I could go on and on about these, but I think you get what I'm talking about so I'll stop.  These are amazing warm - I had one minutes after they came out of the oven.  Once fully cooled, they are crisp on the outside and soft and chewy on the inside.  Even Ween who isn't a fan of coffee liked these cookies. 

yum!
Sugar and Spice Coffee Cookies
makes about 48 cookies

2 tbsp instant espresso coffee powder
1 tbsp hot water
1/2 cup butter, room temp
1/4 cup shortening
1 cup sugar
1/2 cup packed brown sugar
1 tsp baking powder
1 tsp cinnamon
1/4 tsp salt
1 egg
2 cups all purpose flour
Coffee Topping
1/4 cup sugar
1 tsp instant espresso powder

  1. In a small bowl stir together espresso powder and water until powder dissolves; set aside.  In a large mixing bowl beat butter and shortening with an electric mixer on medium-high speed for 30 seconds.  Add sugar, brown sugar, baking powder, cinnamon and salt.  Beat until combined, scraping sides of bowl occasionally.  Beat in egg and espresso mixture until combined.  Add flour and mix until well combined. 
  2. Divide dough into three equal portions.  Shape each portion into a 7 inch long roll.  Wrap in plastic wrap or waxed paper.  Chill for 2-24 hours or until firm enough to slice. 
  3. Preheat oven to 375 degrees.  Line baking sheets with parchment paper or Silpats.  In a small bowl, combine ingredients for Coffee Topping and mix until sugar and espresso powder are evenly mixed.  Cut rolls into 3/8" slices.  Place slices 2" apart on prepared cookie sheets. Sprinkle tops of each cookie with Coffee Topping.  Bake for 9-10 minutes or until edges are lightly browned.  Cool on cookie sheet for 1 minute and then transfer to a wire rack to cool completely. 

Friday, January 20, 2012

Guinness-Milk Chocolate Ice Cream

I love beer.  I've always been adventurous in trying beers, looking for my next favorite beer.  With one of my ex-boyfriends we tried a lot of different beers and I really learned the types I liked and the types I wasn't a fan of at all.  Guinness was one of the ones I'm not a fan of at all.  But when I saw this recipe, I knew I had to make it.  I knew the thickness and unique taste of Guinness would be an amazing pair with the milk chocolate - major points to David Lebovitz for putting this recipe in his book 'The Perfect Scoop' (I highly suggest you get this book.  I said it before - amazing tips on how to make your ice cream better and easier and phenomenal recipes).  I stocked up on what I needed for ingredients - and had to go get Guinness.  My trip to the liquor store was interesting.  I had a good talk with the guy that worked there about the shelf life of Guinness and that I was making ice cream with it - even though it wasn't my favorite beer.  He was amazed that I was making ice cream with it - told me to let him know how it turns out. 

Now all I had to do was line up taste testers for it.  I wasn't going to eat all of this by myself.  And what if I didn't like it? I didn't want to be stuck with it.  Away I went lining people up to try it out - and I soon found out that people were dying to try it once I said what I was making.  I just didn't want to disappoint anyone and was hoping that it would be amazing. 

I set everything up for the ice cream custard base, made sure everything was ready and got going on the custard base.  Before I knew it, I had it chilling in the fridge.  I let it chill overnight and then it was time to fire up Izzy.  Half an hour later - I had ice cream.  And not just good ice cream - amazing ice cream.  First you taste the chocolate, and then the Guinness hits you.  And it's not overpowering at all - just simply amazing.  The flavors work so well together.  I excitedly packed some up for my taste testers and let it freeze.  Then it was time to play treat fairy.  This is always my favorite part of my day - and everyone was so excited to try it out.  And one of my favorite taste tester didn't let me down with her reaction to the ice cream.  She took the lid off of the container and immediately dove in - she looked up at me and said 'phenominal'.  Her reactions are the best - I truly look forward to giving her food each week.  I dropped off the ice cream everywhere and slowly the feedback was getting back to me.  AMAZING!  This is fantastic!  Wow! It's like a Guinness Frosty!  So what are you waiting for?! Go get this book and make this ice cream!! You will not be disappointed at all!! 


hello amazingness

Guinness-Milk Chocolate Ice Cream
makes about 1 quart

7 oz milk chocolate, finely chopped
1 cup whole milk
1/2 cup sugar
pinch of salt
4 large egg yolks
1 cup heavy cream
3/4 cup Guinness Stout
1 tsp vanilla extract

Put the chocolate pieces in a large bowl and set a mesh strainer over the top.

Warm the milk, sugar and salt in a medium saucepan.  In a separate medium bowl, whisk together the egg yolks.  Slowly pour the warm mixture into the egg yolks, whisking constantly, then scrape the warmed egg yolks back into the saucepan. 

Stir the mixture constantly over medium heat with a heatproof spatula, scraping the bottom as you stir, until the mixture thickens and coats the spatula.  Pour the custard through the strainer over the milk chocolate, then stir until the chocolate is melted.  Once the mixture is smooth, whisk in the cream, then the Guinness and vanilla.  Stir until cool over an ice bath. 

Chill the mixture thoroughly in the refrigerator, then freeze it in your ice cream maker according to the manufactures instructions.

Thursday, January 19, 2012

S'mores Truffles

I got really excited when I saw this on My Baking Addiction.  Jaime is a genius and I love seeing what she makes.  When she posted the recipe for S'mores Truffles, I knew I had to make them.  I had to stock up on a couple of supplies, but made some mental notes of what I wanted to change in the recipe.  And of course I doubled the recipe.  Let's face it, I love making truffles, and ones with a mini marshmallow in the middle of it - made me a little mad I didn't think of this first.  If you haven't made truffles before, don't be scared.  They are extremely easy.  The time consuming part is waiting for them to set.  The best part about truffles is that they don't have to look pretty or be perfect.  Taste is what matters with these bad boys. 

I got going on making the truffles and then came the long time of waiting.  It seemed to be going by so slowly.  And then it was time - time to scoop, stuff with a mini marshmallow and roll into a ball and coat in graham cracker crumbs.  I always find this part relaxing for me.  Once I get into a zone I fly through them, and usually sing a song or two in my head while I pass the time.  All rolled, time to chill a little bit before time to eat.  My sisters were waiting patiently (kind of) to try one out. 

so worth the wait
The time had finally come to try one.  Amazing is all I have to say.  The graham cracker coating makes it not too sweet, then you get the rich chocolate truffle, and then a mini marshmallow surprises you in the middle.  The perfect bite.  There is booze in this recipe, if you are making these for kids the alcohol is easily taken out and won't effect the recipe at all.  It's up to you if you want to make them for grown ups only or for everyone.  Either way, these are amazing.

Tuesday, January 17, 2012

Brownie Caramel Bit Cupcakes

I was bored, and when that happens I tend to think things up and try them out.  This one was a success.  I had some caramel squares just sitting in my cupboard, and I hate when things just sit there and don't get used.  What could i put them in?  Cookies - done that a lot.  Cake - not in the mood to go to the grocery store and get more butter and sugar.  Brownies?  I checked to see what I would need and saw that I had everything I needed - brownies it was.  But not in a pan - I can't make something for the first time and not try it - so I made them into cupcakes.  Easy, portable, and the perfect serving size.  Plus I want to use up my cute winter snowman cupcake liners while it's still cold out - well somewhat cold out.  Where I live it's been unseasonably warm and I'm not really liking it.  Bring on the cold and snow! 

I chopped up my caramel squares (Kraft kind, individually wrapped) into pieces.  I used what I had left, which was like 12 blocks.  If you want more or less, add what you like.  Once that was done, onto making the batter.  Brownie batters are always easy.  I really love the ones where you don't need a mixer.  This one, however, is not one of those.  I did break out Big Red (my mixer) for it.  Once the batter was all ready, I added the caramel bits and folded them in.  Filled up each cupcake and off into the oven.  20 minutes later, they were ready. 

look at the caramel peeking out!
They are a little crunchy, but really tasty.  Not sure if I left them in a little too long or if my oven was acting up again, but when you bake them I suggest you try 15 minutes and check them from there.  But this one is a good one - you will be pleased if you are a fan of brownies and caramel. 

Brownie Caramel Bit Cupcakes
makes 18 cupcakes

6 tbsp butter
6 oz semisweet chocolate chips
1/4 cup cocoa powder
3/4 cup all purpose flour
1/4 tsp salt
1 cup sugar
2 large eggs
2 tsp vanilla extracts
12 caramel squares, unwrapped and chopped into bits

  1. Preheat oven to 350 degrees.  Line cupcake tins with paper liners. 
  2. Put butter, chocolate and cocoa powder in a microwave safe bowl.  Heat 30 seconds at a time until butter and chocolate have melted.  Stir until smooth and let cool slightly.
  3. Whisk together flour, baking powder and salt in a bowl.  Put sugar, eggs and vanilla in the bowl of an electric mixer fitted with the whisk attachment, and mix on medium speed until pale, about 4 minutes.  Add chocolate mixture; mix until combined.  Reduce speed to low.  Add flour mixture; mix, scraping down sides of bowl, until well combined.  Stir in caramel bits by hand until well incorporated.
  4. Fill each cupcake 2/3 way full.  Bake for 15-20 minutes, rotating tins halfway through, or until a cake tester inserted into centers comes out with a few crumbs but isn't wet.  Let cool in tins for 5 minutes, then remove and let fully cool on wire racks.  

Thursday, January 12, 2012

Mint Chocolate Chip Ice Cream

It's no secret that I love my ice cream machine.  Izzy is the best, I get excited to use him every time I take him out.  After my first round of making ice cream, one of my friends had said she has an amazing, easy recipe for Mint Chocolate Chip.  I asked her to send it to me - and I'm so happy she did.  Ween is a fan of Mint Chocolate Chip Ice Cream, so I knew I was going to make it.  This recipe is so easy.  Like put everything in a bowl, mix it together and then pour it into the ice cream machine easy.  I'm a huge fan of those.  Excitedly I measured everything out, threw it all in a bowl and mixed.  I got Izzy ready to go, poured the mixture into him and turned him on.  20 minutes later I checked on things and the ice cream was nice and thick.  I added the chocolate chips and let it churn for 5 more minutes.  I had ice cream.  And it was amazing. 

I poured it into a container and let it freeze.  Ween and I had some for dessert last night.  She is a huge fan of this.  I wished I churned it a little bit longer so it was a little bit thicker, but it was amazing.  And the best part is that I was told that this is a great base recipe.  Switch out the extract to vanilla and add whatever you want, like strawberries or coconut, go wild.  You also might have to adjust the amount of peppermint extract depending on the brand you use.  I used McCormack and 2 tsp was perfect. 

a small bowl of deliciousness

Mint Chocolate Chip Ice Cream

2 cups light cream
1 cup milk
3/4 cup sugar
green food coloring (optional)
2 tsp peppermint extract
chocolate chips - mini or regular size

Mix all of the ingredients (minus the chips) in a bowl.  Once combined, pour the mixture into the ice cream machine.  Churn until you have gotten a good consistency and add the chips. 

Tuesday, January 10, 2012

Chocolate Pretzels

I've had my eye on this one for a while.  I wasn't sure if it was just in the shape of a pretzel or kind of taste like one.  Turns out its both.  It's exactly like a pretzel except chocolate and covered in sugar, not salt.  So if you love chocolate and pretzels, then you should try this one out.  Dry and crunchy like a pretzel, with a chocolate flavor coated in sugar to make this sweet treat delicious. 

All I had was Christmas colored
sanding sugar - hopefully
getting supplies this weekend
These are really easy to make.  I did find a few easy tips for you along the way.  Once you get to the part where you roll them out into ropes, flour your hands a little and roll each ball in between your palms until you get your desired length.  It works much faster than if you roll it on the counter.  Don't worry if your pretzels are covered in flour, it will come off when you do the egg wash and in the baking process.  Check them at 30 minutes of being in the oven.  If they are hard and dry, take them out. 

Chocolate Pretzels
makes 2 dozen

1/4 cup cocoa powder
1 tsp espresso powder
3 tbsp boiling water
1/2 cup (1 stick) butter, room temperature
1/4 cup sugar
1 tsp vanilla extract
1 large egg
2 cups all purpose flour
1 large egg yolk
1 tsp water
coarse sanding sugar for sprinkling

  1. Stir cocoa and espresso powders into the boiling water in a small bowl until dissolved.
  2. Put butter and sugar in the bowl of an electric mixer fitted with the paddle attachment; mix on medium speed until creamy.  Mix in vanilla and salt.  Reduce speed to medium-low.  Mix in egg, then cocoa mixture.  Gradually add flour, and mix until a smooth dough forms.  Turn out onto a piece of plastic; pat into a square.  Wrap dough, and refrigerate until cold, about 30 minutes.
  3. Preheat oven to 325 degrees.  Divide dough into 24 equal pieces.  Roll into balls.  Shape balls into 12" long ropes.  Form each rope into a pretzel shape.  Space 1" apart on baking sheets lined with parchment paper or Silpats. 
  4. Whisk egg yolk with water in a small bowl.  Brush cookies with egg wash; sprinkle with sanding sugar.  Bake cookies, rotating sheets halfway through, until dry, about 35 minutes.  Let cool on sheets on wire racks.  Pretzels can be stored in airtight containers at room temperature up to 1 week. 

Friday, January 6, 2012

Homemade Ice Cream

I had been dying to use my ice cream machine that I got for Christmas.  I had named it and everything.  (I tend to name things that I love and use a lot.  I had decided that his name is Izzy).  I got all the ingredients I needed and got going on the recipe from the booklet that came with my machine.  I wasn't expecting things to go smoothly, I kept reading and re-reading the instructions over and over while I was making it.  I didn't want to mess this up.  I got going on the custard base and things were going smoothly.  I was really excited.  Once the custard was all made, into the fridge it went to fully chill.  It was then that I got a text from my friend with an amazing tip.  One I wish I got before I started making ice cream.  She said that I have to go and get a book.  But not just any book, a book that will forever change how I make ice cream.  It's called 'The Perfect Scoop' by David Lebovitz.  It's full of recipes and tips and short cuts.  I am definitely getting this book over the weekend. 

Once my custard is all chilled, I finally get to use Izzy.  I'm so excited at this point.  I get the bowl out of the freezer, put the mixer in, add the custard, put the top on and turn it on.  Izzy was a lot louder than I thought he would be, but it was a wonderful sound nonetheless.  I called my parents to tell them I was making ice cream and that beautiful sound they were hearing was Izzy at work.  They laughed at me like they do when I get overly excited about things like this.  I had to report back when it was finished.  20 minutes later, I had ice cream.  I was pumped.  I put it into 2 Tupperware containers and scooped the rest out for me to eat.  It was soft, but thick and creamy. 

delicious goodness straight from the machine
The taste was amazing - double chocolate and was it ever.  But I wasn't happy with the texture.  It seemed a little dry or crumbly.  Something is missing from this recipe.  I gave some away to a taste tester and he agreed that the taste was amazing, but the texture was off a little.  So now I really can't wait to get that book and try out tons of recipes.  If you have your own ice cream machine at home I highly suggest you get the book as well!!

Thursday, January 5, 2012

Chocolate Ribbon Cookies

These are fun to make.  Easy too, and you could even break it up into 2 days if you really wanted to.  The dough comes together quickly and before you know it you are filling a bread loaf pan with layers of cookie dough.  Let it chill for a couple hours or overnight and then you are good to go.  Slice it into thirds and then take each third and cut 1/4" slices off.  Then bake away.  It's really that easy - and they are very tasty. 

pretty cookie

Chocolate Ribbon Cookies
makes about 48 cookies

1/2 cup butter, room temp
1/2 cup shortening
1 cup sugar
1/2 tsp baking soda
1/8 tsp salt
1 egg
2 tbsp milk
1 tsp vanilla
3 cups all purpose flour
1/3 cup mini semi sweet chocolate chips, melted and cooled
1/2 cup mini semi sweet chocolate chips
1/4 tsp rum flavoring

  1. In a large mixing bowl beat butter and shortening with an electric mixer on medium-high speed for 30 seconds.  Add sugar, baking soda and salt.  Beat until combined, scraping sides of bowl occasionally.  Beat in egg, milk and vanilla until combined.  Beat in flour until combined. 
  2. Divide dough in half.  Stir the melted chocolate into half of the dough.  Stir the 1/2 cup mini chips and rum flavoring into the other half of dough.  Divide each portion in half.
  3. To shape dough, line the bottom and sides of 9x5x3 inch loaf pan or baking dish with plastic wrap or waxed paper.  Press half of the chocolate dough evenly into the pan; top with half of the vanilla dough.  Repeat layers, pressing each layer firmly and evenly over the last layer.  Cover and chill for 1-24 hours or until firm enough to slice.
  4. Preheat oven to 375 degrees.  Line cookie sheets with parchment paper or Silpats.  Invert pan to remove dough.  Peel off plastic wrap or waxed paper.  Cut dough crosswise into thirds.  Slice each third crosswise into 1/4" slices.  Place slices 2" apart on prepared sheets.  Bake 8-10 minutes or until edges are firm and bottoms are lightly browned.  Transfer cookies to a wire rack and let cool.  

Tuesday, January 3, 2012

Chocolate Cream Filled Cupcakes

I had pastry cream left over from the last time I made eclairs in my freezer, and it was bugging me that I hadn't used it up yet.  So I decided to do something delicious with it and got my evil genius on.  I'm a fan of the chocolate cupcakes filled with cream and the chocolate coating on them - I'm pretty sure we all ate them through out our childhoods, and I occasionally have one now from time to time.  So why not make a yellow cupcake and fill it with the chocolate cream i had and then cover it with chocolate ganache?  That was my mission.  It was a huge success.  Everyone loved them - and all my taste testers told me multiple times that I need to make them again.  I also got a suggestion (that I can't wait to try out) for making chocolate cupcakes and making the cream in the middle peppermint.  I promise you will see that one at some point. 

To make these is fairly time consuming, so make sure you have half a day set out for these.  It is a lot of time waiting for things to cool and set, but it is well worth it. You will be amazed at these and peoples reactions at how good they are.  These will be a "go to" recipe for you. 

deliciousness


Chocolate Cream Filled Cupcakes

Pastry Cream:
2 cups whole milk
1/2 cup sugar
1 tsp vanilla extract
pinch of salt
4 large egg yolks
1/4 cup cornstarch
8 oz semisweet chocolate chips
2 tbsp butter, cut into small pieces
1 1/2 cups heavy cream

  • In a medium saucepan, combine the milk, 1/4 cup sugar, vanilla extract and salt.  Cook over medium heat until mixture comes to a simmer. 
  • In a medium bowl, whisk together the egg yolks, cornstarch and remaining 1/4 cup sugar.  Whisking constantly, slowly pour about 1/2 cup of the hot milk mixture into the egg yolk mixture.  Continue adding milk mixture, 1/2 cup at a time, until it has been incorporated.  Pour mixture back into saucepan, and cook over medium-high heat, whisking constantly, until it thickens and registers 160 degrees on an instant read thermometer, about 2 minutes. 
  • Transfer to the bowl of an electric mixer fitted with the paddle attachment.  Add the butter and chocolate and beat on medium speed until both are melted and the mixture cools, about 5 minutes.
  • Cover with plastic wrap, pressing it directly onto the surface of the pastry cream to prevent a skin from forming.  Refrigerate until chilled, at least 2 hours or up to 2 days. 

While the Pastry Cream is chilling, make your favorite yellow cupcake recipe according to the directions and let cool.  When fully cooled, cut out the centers of each cupcake. 

Finish Pastry Cream: Just before using, beat pastry cream on low speed until smooth (you can also whisk by hand). 

  • Whip heavy cream to stiff peaks.  Fold the whipped cream into the Pastry Cream in two batches to lighten. 


  • Transfer Pastry Cream to a large ziplock bag and snip the corner.  Pipe the cream into the center of each cupcake, filling the hole.  Fill to the top of each cupcake.

    Make Chocolate Ganache:  In a microwave safe bowl, place 6 oz semisweet chocolate chips, 6 oz butter and 2 tsp light corn syrup.  Heat 30 seconds at a time until melted.  Stir until smooth and let stand 5-10 minutes until thickened, stirring occasionally.  Once mixture is thickened, spoon 1 tsp over the tops of each cupcake, covering the pastry cream.  Let chocolate set, refrigerate for at least 30 minutes.